- Detalhes
- Read Time: 4 mins
Chapter 8 - Mining
As well as rearing animals and growing crops, you can also set up mining for minerals, precious stones and other underworld goodies. Mining requires access to water and electricity so you will need to have set up the electricity system and also have a water tower near where you are mining.
(a) Mining equipment
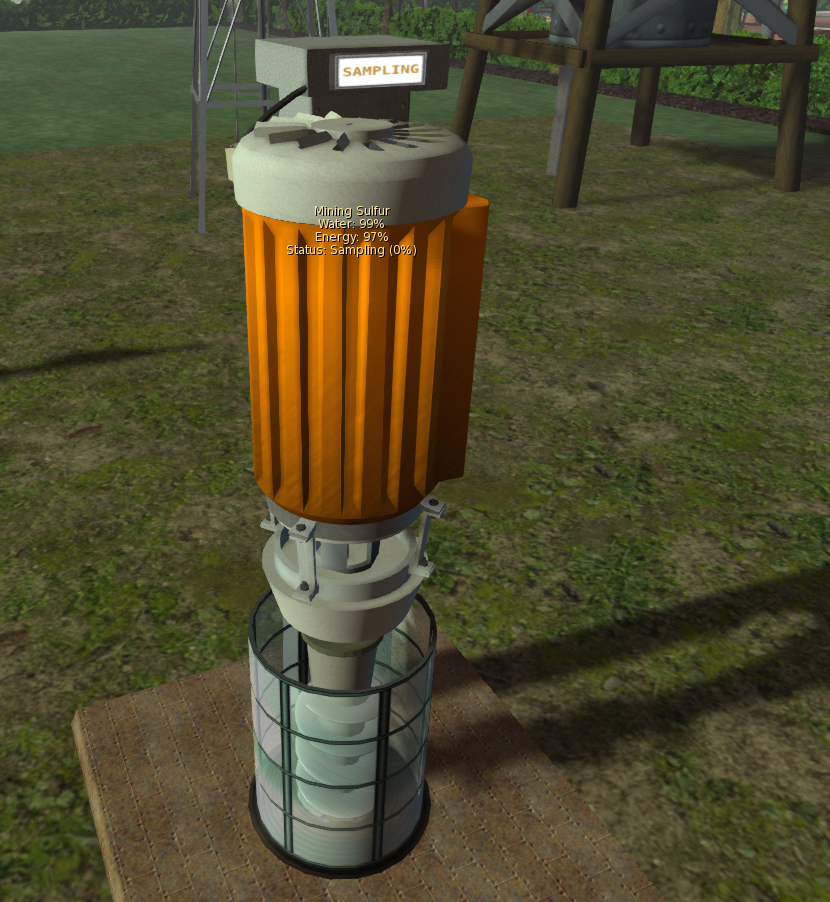 To start mining you can put out one or more of the drilling items from the Mining platform (box 10) – these may be the SF Mine, SF Rig etc.
Mining equipment calls for power from the power grid when needed so as long as there is enough stored on your grid you don’t need to do anything further. Mines also require water and you can add this manually (the same way you water plants, top up animal feeders etc.) or you can select the AutoWater option to have it pull water from the nearest water tower when needed.
Mining equipment can be used to mine for any of the items contained in its inventory. To add more items, just place a copy into the equipments inventory. All items take the same time, water and power which is set in the config notecard. If you wish to have different mining times for different products, you can create copies of the equipment set with different values.
# Mining time in seconds
LIFETIME=12000
#
# How many times water needed during one mining cycle
WATER_TIMES=2
#
# Offset when rezzing items
REZ_POSITION=<-1.0, 0.0, -2.0>
#
# Default language
LANG=en-GB
(b) Mining plants
Included in the mining platform you will find SF Gems which are plants that grow various crystals and minerals. You grow them in exactly the same way as trees with water and the option to add manure. They produce a wood object which is actually SF Mineral. Gem plants glow so look great in dark locations!
(c) Mining animals
Also included in this platform is the SF Rock Feeder which is the default animal feeder for the Pet Rock (you can rez this ‘animal’ from the standard animal rezer). The rock feeder takes food in the form of minerals like phosphorous, sulfur iron ore etc.
Pet rocks behave much the same as any other animal although by default they are set no to walk around (although you can turn walking back on if you wish.) The adult male will move though if you select to mate with a female rock.
(d) Creating mining areas
Mines come in various types – surface mines are very easy to set up, jut put the mining equipment in your desired location in your region and off you go!
Alternatively you may wish to mine river channels, beaches etc.
And if you fancy an underground mine then you could use terraforming to create a hollowed out mound with a roof prim disguised to match the surrounding terrain.
If you don’t fancy tackling land terraforming (or don’t have the rights) then a great alternative is to create your mine as a sky-box and perhaps use an impact type teleport as the mine entrance. Although not included in the mining box, you will find items for making caves and mines at the main shop on Mintor (be warned though you will probably find you need quite a lot of patience!)
- Detalhes
- Read Time: 3 mins
4.4 - Nutrition & Health
(d) Custom nutrition values
The HUD contains a list of ‘nutrition’ values for all of the main items in the VivoSim system. Nutrition covers hunger and thirst as well as drunkenness, health, hygiene, bladder and energy. This information is kept updated via the VivoSim servers. Please do let us know if something is missing! You can also add your own entries, either for new items that you have created or to use different values from the default VivoSim ones. Just edit the notecard in the HUD called DATA_ USERVALS
The HUD always checks for nutrition information by first looking in the DATA_USERVALS notecard, then if not found it checks the default values notecard, and finally, if still not find it checks the config notecard in the product. If it still can’t find any values you will get the message that nothing useable was found in the item.
The format for adding values is the name of the product (without the SF part) followed by what percentage to use and then the actual values. As an example, the default values for SF Apples are written as:
Apples|25|Thirsty:-5|Hungry:-20
This tells the HUD to use 25% of the product (so you can get four helpings from the one bucket of apples) and it will decrease thirst by 5 and decrease hunger by 20
You can specify one or more of the various nutrition parameters which are:
Thirsty: A negative value will decrease your thirst. Positive values will make you more thirsty.
Hungry: A negative value will decrease your hunger. Positive values will make you more hungry.
Drunk: A negative value will decrease your drunkenness. Positive values will make you more drunk.
Health: A positive value will improve your health. Negative values will decrease your health (make you more sick).
Sick: This is just the reverse of health, so a positive value will make your more sick and a negative value will increase your health (make you less sick).
Energy: A positive value will increase your energy level. Negative will decrease it.
Hygiene: A positive value will increase your hygiene. Negative values will decrease it i.e. make your more ‘dirty’
Bladder: Negative values will decrease the fullness of your bladder. Positive values will relieve it.
Age: MinAge & MaxAge to specify what age range can use this item.
* For positive values you should just enter the number. Do not include the + sign
Widget|25|Thirsty:-15|Hungry:-1|Bladder:10 CORRECT
Widget|25|Thirsty:-15|Hungry:-1|Bladder:+10 INCORRECT
(e) Health and Happiness
As well as the values you get from using things, you can also affect your health and well-being in other ways:
Making things
Making anything on a machine that requires you to ‘sit’ needs energy to complete the task. This is checked before you start and the machine will let you know if you don’t have enough energy. Once the item is complete, your health will increase by 20.
ANIMALS
Pet an animal (close by & below 90 for happy)
Health: 5
Name an animal
Health: 1
Have animal follow you
Health: 1
Get manure
Hygiene: -1
Get feathers
Health: 5
Get wool
Health: 5
Get milk
Health: 5
Get eggs
Health: 5
Mate animal (must be close to animal)
Health: 2
Butcher
Health: -5, Energy: -1
Fishing (each complete catch)
Energy: 2, Health: 20
Bee hive – get honey
Health: 10
Bee hive – stung
Health: -5 per sting
CROPS
Harvesting crops
Health: 5, Hygiene: -1, Energy: -2
Planting crops
Health: 5, Hygiene: -1, Energy: -1
Watering plants
Health: 5, Energy: -1
Adding manure
Health: 5, Hygiene: -1, Energy: -1
Get wood
Health: 2, Hygiene: -1
Clean up dead plant
Hygiene: -5, Energy: -2
Put flowers in vase
Health: 5
FURNITURE
Lit fire (approx every 10 minutes if you are close to it)
Energy: 10, Health: 5
Chair (default sit time is 2 minutes)
Health: 10, Energy: 80
Shower (default use time of 2 minutes)
Hygiene: 99, Health: 30, Energy: 30
Bath (default use time of 3 minutes)
Hygiene: 50, Health: 10, Energy: 50
Bed (default use time of 2 minutes)
Hygiene: 99, Health: 30, Energy: 30
Sink - Wash
Hygiene: 55
Sink - Shave
Health: 55
Dresser - Makeup
Health: 55
WC (Toilet) – Number 1
Bladder: -30, Hygiene :-5
WC (Toilet) – Number 2
Bladder: -100, Hygiene: -10
PRODUCTS
SF Energy
Energy:55
SF Health
Health: 55
SF Hygiene
Hygiene: 55
SF Fresh
Bladder: -55, Hygiene: -10
HUD
100% on work indicator
Energy: 25
- Detalhes
- Read Time: 3 mins
4.3 - Provisions box & Backpack
(b) Provisions
The provisions menu item gives you a useful way to convert harvested items into food, drink and other units that you can then access when away from your home. You can also store wood and kWh. Apart from the wood and kWh, items added are changed into ‘units’ and can’t be retrieved as the original item. As an example, if you store SF Apples you will see the Food and Drink levels increase. You can then use the stored provisions to eat, drink etc (each use reduces the level by 20).
Note that you can ‘consume’ items from your provisions store without having to rez them first, so that makes it handy for when you are in a location where you don’t have rez rights. Also, using items from your provisions means that, unlike when you eat actual food and drink, you do not end up with part eaten items.
Note also that if you rez your provisions box, anyone in the same group could take the box into their HUD unless you have rezed it in the locked state. So an unlocked box could be used as a way to share provisions with others.
(c) Backpack
The SF Backpack allows you to store and retrieve virtually any product/produce. It is useful for transporting products between regions and even grids.
The inventory list is saved on the Quintopia servers so you can take the backpack in and out of inventory and even replace it and you should always be able to access stored items. The backpack also keeps a copy of your inventory in a notecard in case you do not have a connection to the server. Items put in can be taken out, so if you store SF Apples in the back pack you will see the count for SF Apples increase by one. It will decrease by one when you choose to rez the SF Apples back from the backpack. Note that you need rez rights to take items out of the backpack.
You can access the menu for the backpack either from the HUD or by touching the backpack. You do not need to be wearing the HUD to use the backpack.
- Detalhes
- Read Time: 7 mins
4.2 - HUD Interface
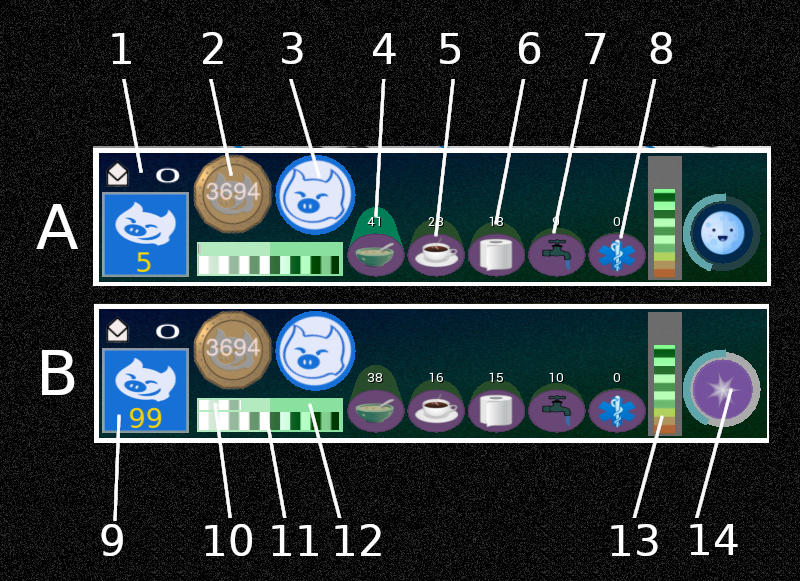
| 1 | Messages - Touch here for message menu | 8 | Health |
| 2 | How many Vivo coins you have | 9 | Your experience points (XP) total |
| 3 | Your mood (coming soon...) | 10 | Activity progress (top) |
| 4 | Hunger level | 11 | Activity progress (bottom) |
| 5 | Thirst level | 12 | Server status |
| 6 | Bladder level | 13 | Energy level |
| 7 | Hygiene | 14 | Region clock |
Notes:
Bladder and hygiene indicators are only active if the HUD is operating in ‘health mode’.
When you first start using VivoSim, you will earn 1 XP every time the lower progress bar reaches maximum (A) When you reach the 50 XP you are promoted to the next rank and now when the low bar reaches maximum, the upper bar will increment (B). When the upper bar reaches maximum you will get 1 XP
Touch the HUD to get the menu (note that touching the top display screen will close the screen rather than show the menu and touching the mail icon will show messages menu)
(a) Menu items
This scans for items nearby to allow you to use them (eat, drink etc).
Inspects items to let you know their nutrition values.
The provisions menu allows you to convert items into units of food,drink, booze and medicine. It also lets you store wood and kWh. You can use the contents of the box either by rezzing it or via the menu.
Allows you to use food, drink, booze and medicine directly without having to rez it. This is useful when you are visiting places where you don’t have rez rights.
Allows you to store nearby items in the provisions box. The item is converted in the corresponding unit e.g food units, drink units etc. You also use this to take the rezzed provisions box back into the HUD.
If you have rez permissions, will rez the provisions box.
This will lock the provisions box so that when rezzed only you can use it.
Shows the levels and also forces the HUD to update the server backup with your current levels.
If you lose the contents of the provisions box you can try to retrieve them from the server backup.
Menu option only shown if you are wearing the backpack
List what you have stored in the backpack.
Allows you to add a new product into the backpack so that you can then store and rez that item.
Select the menu language for the backpack.
Adds nearby items to the backpack.
Retrieve item from the backpack (you must have rez rights in that location).
Pitchfork
Menu option only shown if you are wearing the pitchfork
Check
List what you have stored in the pitchfork.
Rez Product
Rez out one item from the pitchfork (you must have rez rights in that location).
Add Product
Add out one item to the pitchfork.
Transfer
Allows you to transfer all of the stored product into the corect storage. After selecting transfer, touch the storage unit to confirm and th transfer will start. You do not need rez rights to do a transfer.
@
Select the menu language for the pitchfork.
Displays your status and also gives a menu of the following:
Turn the status HUD on or off.
Forces any animation from the HUD to end.
Toggle ‘away from keyboard’ mode.
Toggle OOC (‘out of character’) message on display HUD.
Options for your VivoSim account:
Lets you know what your current XP value is.
Tells you how many Vivo coins you have.
Lets you send, read and delete messages.
Use this to link your in-world avatar with your VivoSim account (using the code on your profile page on the VivoSim.net website).
Scans for specified animals, giving you some statistical information about them.
This menu gives you various information to help you use the system:
Lists the nutrition values of all known items.
Provides a clickable link to the user guide on the VivoSim website.
Provides a clickable link to the forum on the VivoSim website .
Options menu:
Set the scan radius (in m) to be used when scanning for animals.
Sets the rate at which your avatar needs to do things like eat and drink. You can select between High (fastest), medium and low.
When you start out you will get 1 XP from being active approximately:
High ~ 4.5 hours
Medium ~ 7.5 hours
Low ~ 12 hours
Once you get to the next ranking you will start using the upper indicator as well (see above information) Note that you can also do tasks and targets to earn more XP
Toggles the echo mode which when on will echo the screen messages to local chat.
Toggles health mode on or off. When health mode is off you only need to deal with hunger and thirst.
Toggle visual and sound effects on or off. When on, you will get flies buzzing around you if your hygiene is poor and flying toilets if your bladder is getting full (both those only work if you are wearing the status HUD) There are also animations that play if you become sick and various sounds that play when effects are on.
If you are not seeing the flies or toilets, it's worth checking in Preferences menu in Firestorm, under Graphics then Rendering tab, that the option Render Attached Particles is selected, otherwise you won't see them (but you should still hear the sounds).
Toggles the text on the status HUD between single line spaced and double line spaced.
Put the HUD into paused mode. Whilst paused none of the values for hunger, thirst XP etc. will not change. The HUD may go into pause mode automatically if you are wearing it when you enter a region that does not have the correct permissions for it to operate. Touch the HUD to have it begin the start-up test and resume operation if possible.
Sets the language the HUD uses for buttons, messages etc.
Loads the advanced menu:
Turns on debug functionality (this may depend upon the HUD version as to what debug info it gives.
This forces a reset of the HUD. It will set all values to the starting values. Note however it will not affect your XP or coin balance, although it may take a while before the HUD updates to show the correct value.
Resetting the HUD also clears the provisions box lock code, so you are advised not to have the box rezzed in the locked state as you will not be able to unlock it after the reset.
Menu option only shown if you have ababy attached
This calls up the menu system for the SF Baby. See separate information for using that system.
- Detalhes
- Read Time: 1 min
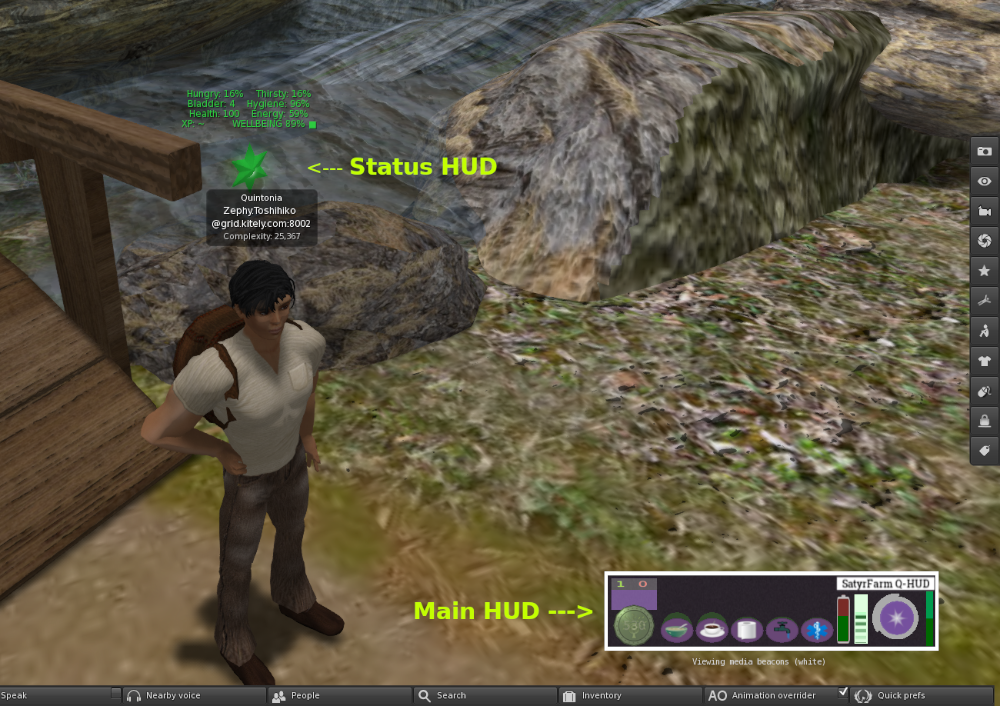
4.1 - HUD
The VivoSim HUD is an optional system you can use to extend the functionality of the farming system. It allows you to eat and drink items and has an optional ‘health’ mode that requires you to look after your health, hygiene and well being.
It consists of the main HUD that by default sits bottom right of your computer screen. It can only be seen and used by you. There is also an optional status HUD that you wear and it floats above your head where it can be seen by everyone.
The HUD system allows you to interact with the VivoSim system and can also link your in-world avatar with your VivoSim website account, so you can collect experience points (XP) and Vivo coins.
If you don’t already have an account, go to https://vivosim.net/register and fill in the user registration. You will receive an email with a link to activate your account. Next log in and select Profile from the main menu (https://vivosim.net/profile)
You will find a link key that is unique to your account. To link your avatar you can either use one of the terminals in any of the VivoSim regions, or use the Account option on your HUD
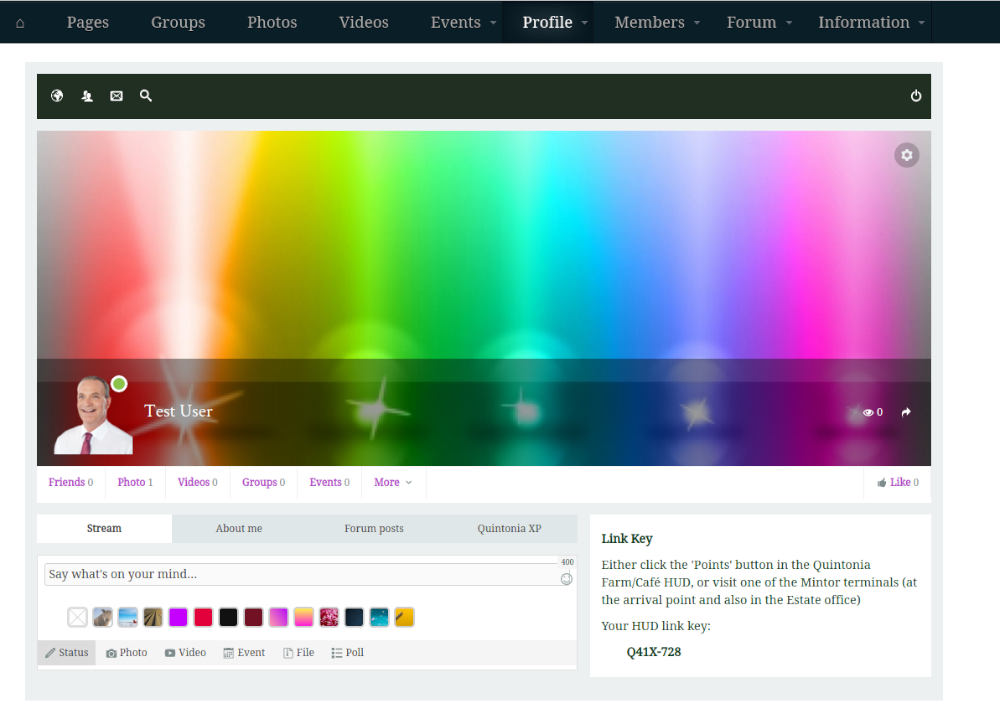
You will be prompted to type in the link key. Once this is done your avatar is linked to your VivoSim.net account. If you ever change the avatar you can unlink the current avatar and then link in the new one. All XP, Vivos, provisions and backpack items will be transferred to the new avatar.
When you first enter a new region the HUD will re-check to see if the required OSSL permissions are available (assuming you have permissions for scripts to run) and if not will put the HUD into paused mode.
- Detalhes
- Read Time: 3 mins
3.3 - MORE MACHINES
Now you are producing more crops and products on your farm you might want to look into making more things and so you can rez out the Crafting platform (box 5) to take a look at what is available.
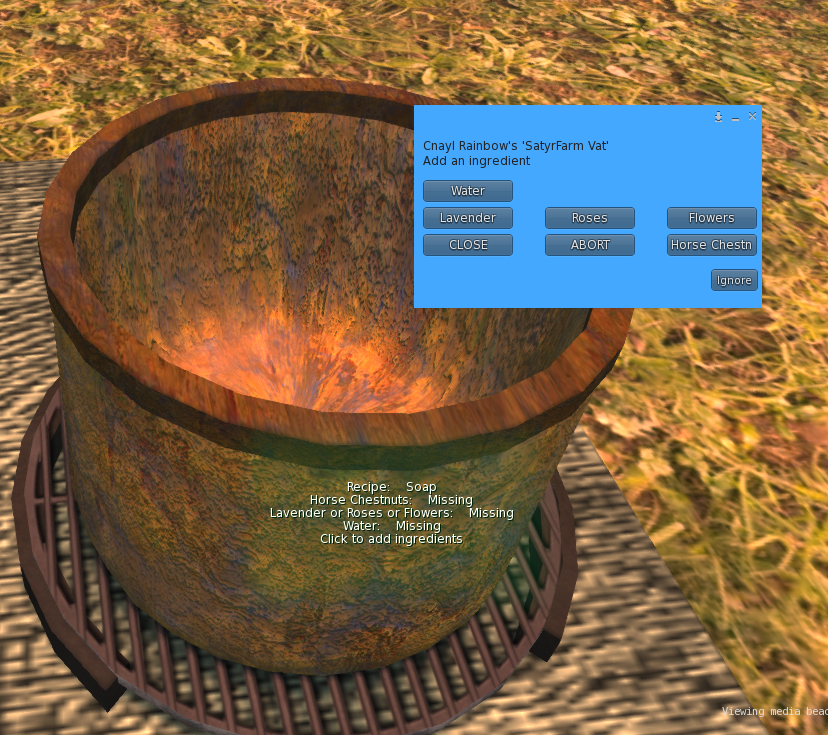
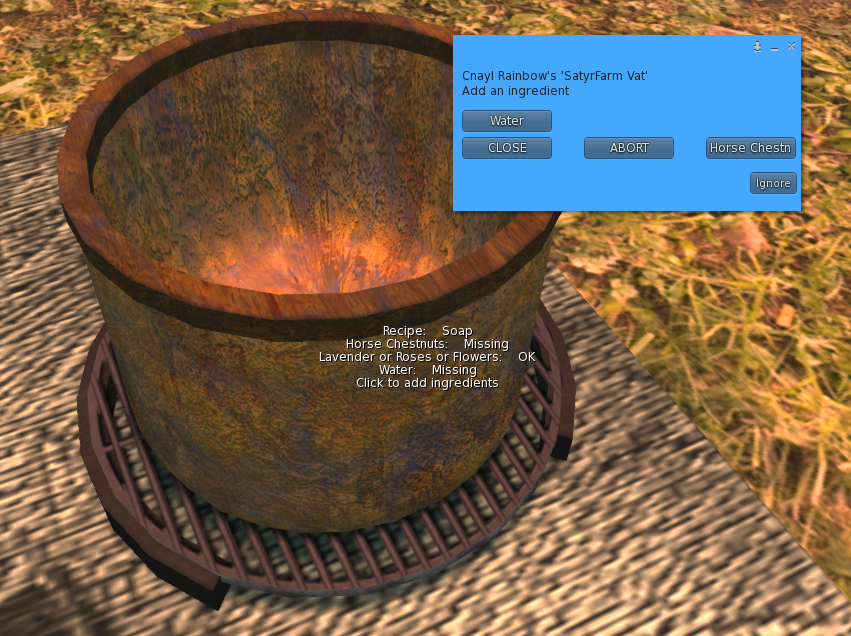
You perhaps recall that the way ‘machines’ work is that you touch them to get a menu and selecting Make will list all the items that can be made. Some machines only make one or two things, others make many! When you select an item to make the menu then shows what is required. Note that on the menu it will show all items, but if you look at the float text over the machine you will see if any of those items are part of a choice. As an example, if you click on the SatyrFarm Vat and select to make Soap you will see Lavender, Roses and Flowers all on the menu, but the float text shows that it is a choice and you can use lavender or roses or flowers. So if we add flowers the menu will then show what remains to be added:
At any point you can press the ABORT button to stop the making process, but be aware that any ingredients that you have already added will be lost. You can however leave the machine as long as you wish to wait for further ingredients to be added. So you could start adding, then find you are missing one ingredient – just click on the CLOSE button and then when you have that item, click again for the menu and to continue the making process.
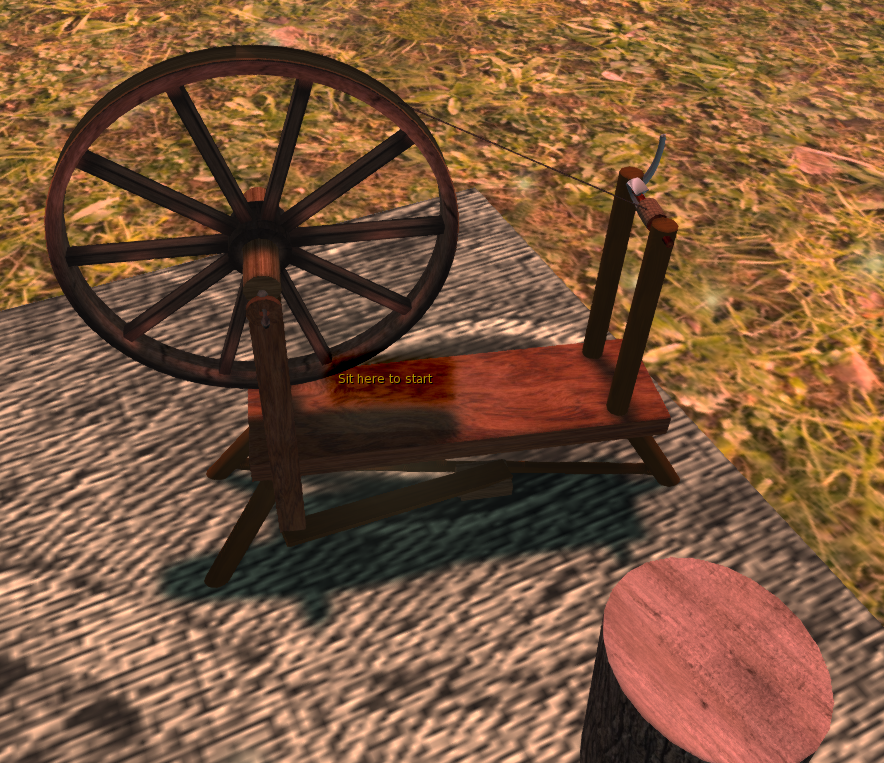
Another thing to watch for is that some machines require you to ‘sit’ at them. You will see this once you have added all ingredients – the machine will say ‘All set, preparing …’ and then it will not start making but instead show ‘Sit here to start’ and you should find that when you mouse over the machine, the click action is to sit. The SF Spinning Wheel is one machine that requires you to sit.
Once you start making (by sitting) you will need to stay there until the process is complete. If you stand before that, your progress will reset to 0% and you will need to sit to restart from the beginning.
On completion, the machine will rez one or more finished products.
- Detalhes
- Read Time: 2 mins
3.2 - MORE ANIMALS
Along with growing more crops, you might want to add more animal types. Rez out the Animal extras platform (box 3) and you will find feeders for more animal types. You will also find some ‘low maintenance’ animals:
(a) Bees
The SF Beehive allows you to keep some bees. You can put out as many bee hives as you like as they don’t require much from you! Over time the bees will start to fill up the honeycomb and when it gets to 100% you can collect it by touching the beehive. Note though that if you (or an NPC Farmer) bump into the hive, it will upset the bees and unhappy bees won’t let you have the honeycomb even when it is full – you will just have to wait until they calm down. To get honey, you use the extractor (see section on Machines & Crafting)
The beehive is an ‘insect’ system – you can find out more about keeping insects later
(b) Fish
You can use the fishing spot to go fishing. Simple place near water then sit to start fishing. Once your progress gets to 100% the fish will be put in the nearby SF Fish Barrel. If you wish to use the fishing system away from water (in a sky-box say) then you can edit the config notecard and set to:
FORCE_WATER=0
(c) Chicken Coop
The SF Chicken Coop will produce eggs and chicken meat for you as long as you make sure it is kept fed and watered. You can turn on auto water and auto food to make things easier if you prefer. By default the coop will take corn out of the nearest SF Storage Rack and water from the nearest SF Water Tower, but you can change that by editing the config notecard if you want it to use something else. Note that the SF Chicken Coop doesn’t actually use any chickens to make it work, but you can keep actual chickens nearby for effect or add some ornamental chickens (you can get these at the farm store on Mintor region)
(d) Other animals
When we first rezzed some animals (cows, sheep etc.) I’m sure you saw the large number of other animals listed! You can go ahead and rez any of these now to grow your farm.
Once an animal is born, you can touch it and select the Info button to find out what feeder the animal uses, then make sure to put one within the animals range (by default a 10m radius but can be changed from the Options menu)
The animal feeders can have food manually added to them – touch the feeder to get a menu with the different food items it takes. You can also set them to auto food and auto water to have them take an item from nearby storage when levels get low. If you look in the config notecard for the feeder you will find what storage unit it uses and which item it takes from it.
- Detalhes
- Read Time: 5 mins
3.1 - MORE CROPS
If you haven’t already, rez out a copy of the plants platform (box 2) – it’s worth pressing 
 first to have the edit tool active so you can move the platform when rezzed. The plants platform contains more trees and plants that you can add to your farm. Click on any plant to get the menu, then click on Plant to see what you can grow.
A few points to note:
-
Flower planter – this grows flowers that can then be displayed in vases
-
SF Physic Garden – this grows flowers that give petals and other medicinal crops
-
SF Vine & Trees – by default, these will automatically replant with the same crop after harvest. You can change this via the config notecard (see later)
All plants and trees work the same way as the fields you have already planted, that is you can turn on automatic watering if you wish and also automatic harvesting. If you are using automatic watering you should make sure there is a ‘water tower’ within range (96m) Keep an eye on the water tower levels as if you have a great many crops and animal feeders you may need more than one water tower in that area. You will find further information on irrigation in chapter 9.2
(a) NPC Farmer changes
If you wish to use the NPC Farmer to water and harvest your new crops you may need to edit the configuration. First touch the NPC-Farmer Controller pillar and select to remove the farmer. Next right click the pillar and select Edit. Go to the Content tab and there you will see the notecard called config which by default contains an example of thevarious settings needed to get the farmer working. You can edit it to, for example, add more crops using the TREE= lines. As an example, to get the farmer to visit the SF Physic Garden you would add the line:
TREE=SF Physic Garden|1|Sunflowers
This tells the farmer to visit the SF Physic garden and water it if needed. It will also plant sunflowers for you and harvest any crop when ripe.
To have more than one thing planted just add to the list e.g.
TREE=SF Physic Garden|1|Sunflowers,Chamomile,Lavender
This tells the farmer to randomly select one of the items on each planting.
The number (1 in this case) is used to set the visiting frequency. So if you wanted the farmer to visit the physic garden twice as often as a tree you could set as follows:
TREE=SF Physic Garden|2|Sunflowers,Chamomile,Lavender
TREE=SF Tree|1|Apple tree,Pear tree
So in this case, on average, the farmer would visit physic gardens twice as often as trees. As well as editing the crops to visit, you will also need to change where the farmer stores things – see next section.
(b) Storage
As you add more crops you may notice that the SF Basic Storage we have been using does not list the crops produced by our new plants and trees. We need to look and see what extra storage options we have by rezzing out the storage platform from box 4
This contains many different storage items but for now we are just going to use the SF Storage Rack
T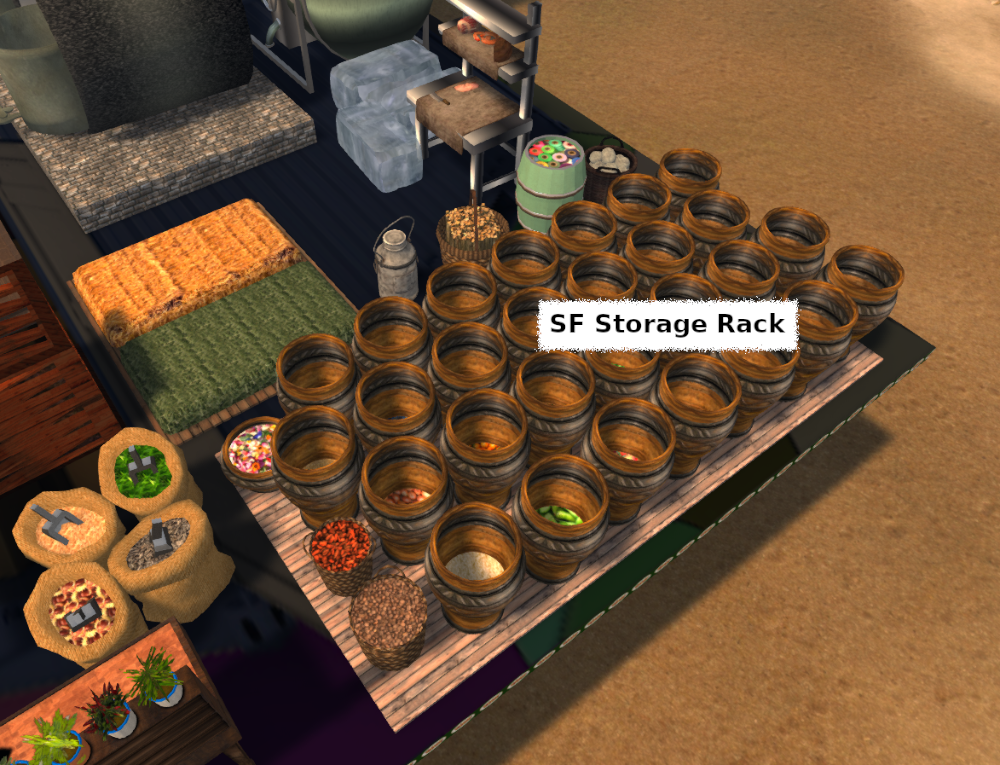 his has storage for a large number of crops. If you want to grow something that produces a crop not stored in this storage rack, just look over the other storage options to find one that includes it.
You can put the SF Storage Rack anywhere you wish, but if you are using the NPC farmer you should ensure that it is placed within the range of the farmer (you can touch the pillar and select Rez fence and this will rez a circular fence showing the approximate area covered by the farmer. Touch the fence to delete it).
You will need to edit the config notecard for the NPC Farmer and change the harvest store item:
HARVEST_STORE=SF Storage Rack
This tells the farmer to store everything it harvests in the SF Storage Rack. If you have some crops that the farmer will harvest that are not stored there, you can specify an alternative storage unit and what to put in there.
As an example you may wish the farmer to look after herb gardens and so could set as:
TREE=SF Herb Garden|1|Basil,Parsley,Rosemary,Thyme

SECONDARY_STORE=SF Herb Bench

SECONDARY_ITEMS=SF Basil,SF Parsley,SF Rosemary,SF Thyme
- Detalhes
- Read Time: 6 mins
13.5 Plantas, árvores e campos
As plantas são objectos que crescem ao longo do tempo, passando pelas fases de vazio, novo, em crescimento e maduro (e também morto). Precisam de água para crescer e podem ser aceleradas pela aplicação de estrume. Normalmente, as plantas são coisas como árvores, campos, plantadores, etc., mas também podem ser usadas em animais e outros objectos! As plantas produzem uma única colheita, mas também podem ser configuradas para produzir subprodutos como madeira, folhas, ramos, raízes, etc.
A aparência da planta durante as várias fases pode ser controlada por diferentes texturas ou por prims.
As plantas primárias e os subprodutos são novas funcionalidades que não se encontram nas versões anteriores do sistema.
(a) Plantas baseadas em texturas
Estas consistem no prim de conteúdo e num prim chamado Folhagem. Podes também ter outros prims para solo, troncos, etc.
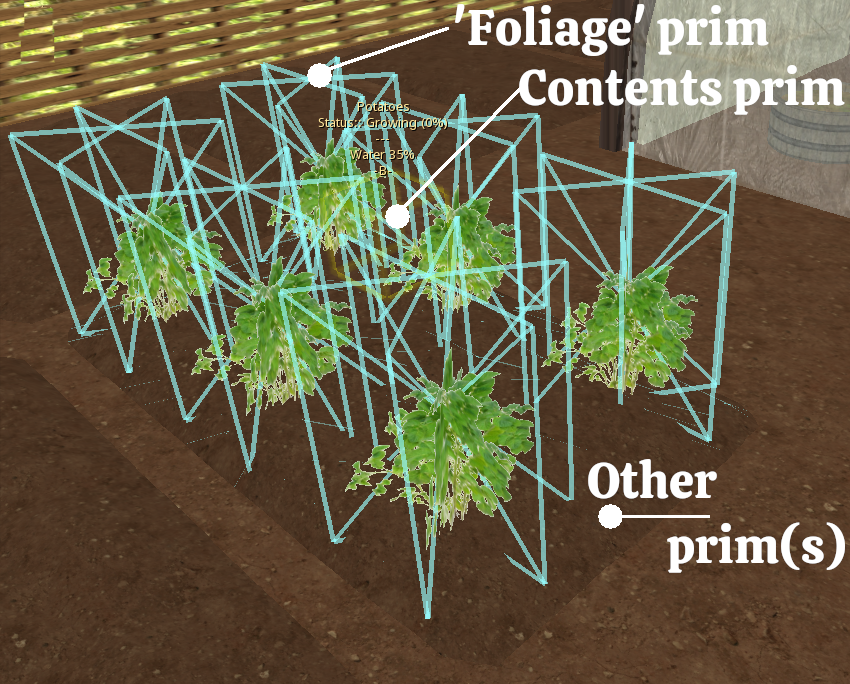
Sem nada plantado, o prim da folhagem é definido com 100% de transparência, depois, durante cada fase de crescimento, em vez de transparência, é aplicada uma textura ao prim que corresponde à fase de crescimento. Por exemplo, se a cultura for Alface, as texturas utilizadas chamar-se-ão Alface-Nova, Alface-Crescendo e Alface-Madura (note que a capitalização é importante!)
Adicionar uma nova cultura a uma planta existente
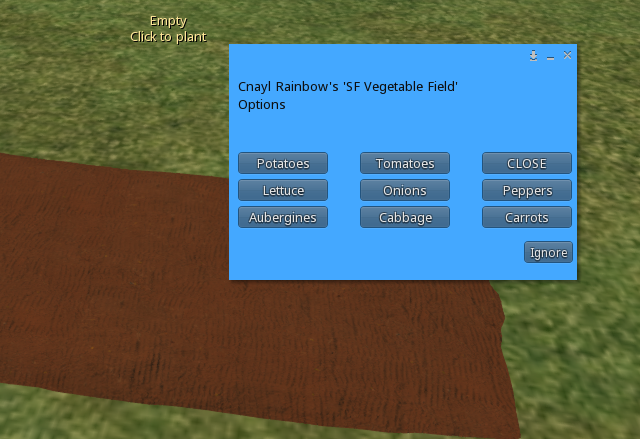
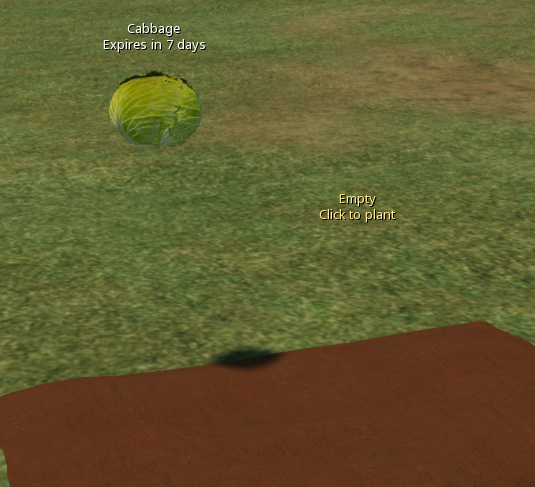
Provavelmente, a forma mais fácil de criar um novo produto de colheita é adicioná-lo a uma planta existente (como um campo, uma plantadeira, etc.). Note que o número máximo de plantas em qualquer item (árvore, campo, plantadeira, etc.) é 11, por isso vamos começar com o SF Campo Pequeno e transformá-lo num novo item a que chamaremos SF Campo de Legumes e vamos adicionar a couve como uma nova cultura.
Primeiro, mudamos o nome do SF Small Field para SF Vegetable Field e removemos algumas das culturas existentes para dar lugar à nova (uma vez que este será um campo de vegetais, removemos Pot, Strawberries, Sugar Cane e Tea), eliminando do conteúdo
SF Erva, SF Morangos, SF Cana-de-açúcar, SF Chá
Erva-nova, Erva-crescente, Erva-madura
Morangos-novos, Morangos-crescentes, Morangos-maduros
Cana-de-açúcar-nova, Cana-de-açúcar-crescente, Cana-de-açúcar-madura
Chá-novo, Chá-crescente, Chá-maduro
Também precisamos de os remover do bloco de notas de configuração e, nesta altura, também podemos acrescentar a nossa couve:
# Lista de nomes de plantas disponíveis (sem prefixo SF) PLANTLIST=Beringelas,Couves,Cenouras,Alface,Cebolas,Pimentos,Batatas,Tomates # Lista de produtos correspondentes PRODUCTLIST=SF Beringelas,SF Couves,SF Cenouras,SF Alface,SF Cebolas,SF Pimentos,SF Batatas, SF Tomates
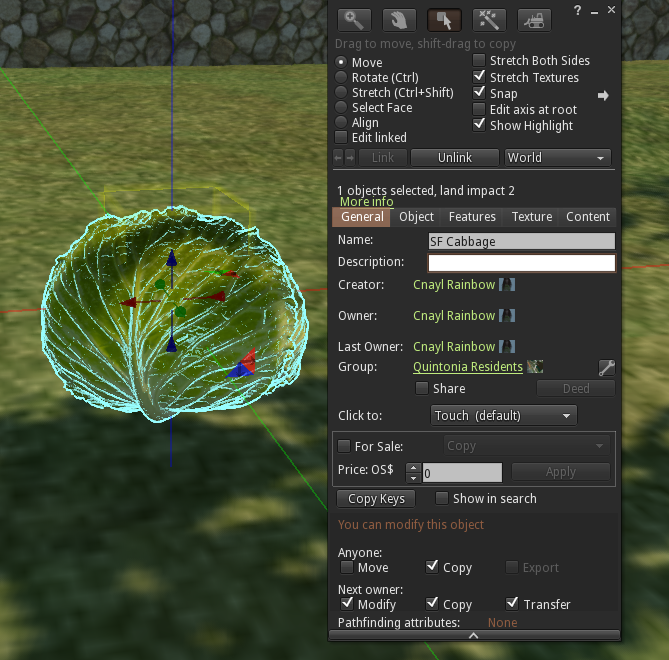
Agora estamos prontos para acrescentar a nossa couve e a nossa cultura. Para o fazer, precisamos de três texturas e de um produto. As texturas devem ser nomeadas de forma a corresponderem à entrada na PLANTLIST e seguidas de -New, -Growing, -Ripe, por isso, para este caso, serão Cabbage-New, Cabbage-Growing, Cabbage-Ripe O nosso produto (o item que é rezzed quando se faz a colheita) é SF Cabbage
Para criar o produto, consulta essa secção do guia. Uma maneira fácil de criar um novo produto é usar um dos baldes de colheita existentes e mudar o nome e a textura no balde, mas é claro que podes criar o produto como quiseres!
Para criar texturas, esta pode ser muitas vezes a parte mais difícil de criar uma nova planta, especialmente se tiver o cuidado de trabalhar apenas com imagens que sejam do domínio público, de modo a evitar infringir quaisquer direitos de autor! Sítios Web como https://www.textures.com e http://texturer.com podem ser úteis.
É preferível que as três imagens tenham as mesmas dimensões, para que as possas dimensionar da melhor forma. As imagens devem ser transparentes, pelo que terá de as guardar como ficheiros PNG em vez de JPG.
 |
 |
 |
| Textura Couve-Nova | Textura Couve-em-crescimento | Textura Couve-Madura |
A nossa SF Couve (malha)
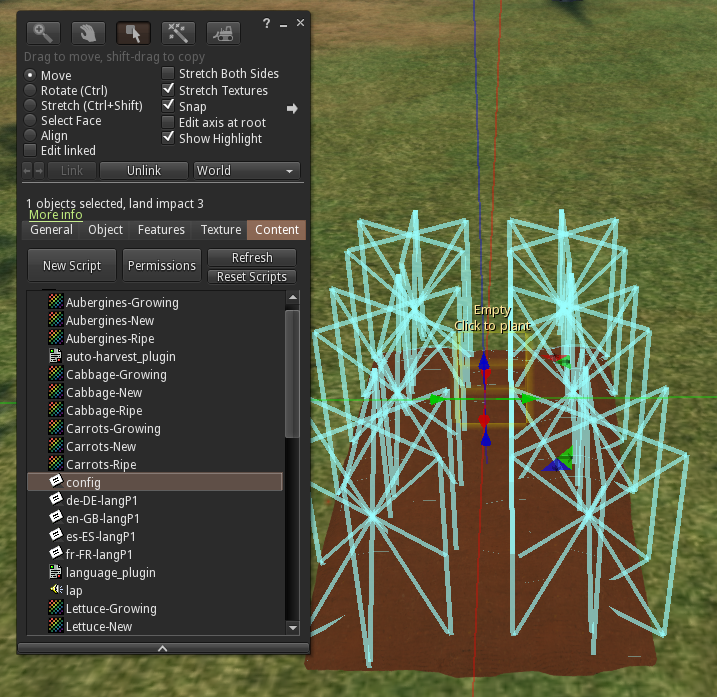
Adicionamos as três texturas e a couve SF ao conteúdo dos campos e, para termos a certeza de que tudo se encaixa, apagamos qualquer texto nos campos Description (Descrição) e fazemos um Reset Scripts (Reiniciar Scripts)
Devemos agora ter um campo vazio pronto para testar. Clique no campo e selecione o botão Plant (Planta) e, com sorte, verá Cabbage (Couve) listada como uma das opções. Se não for o caso, volte a verificar o bloco de notas de configuração.
 Selecione para plantar o seu novo item (neste caso, couve) e pode ver o seu aspeto na fase "Novo".
Se não vires a textura da planta, verifica o nome das tuas texturas. É importante que sigam as letras maiúsculas e minúsculas corretas. Se, por exemplo, tivéssemos chamado à textura Couve-Nova ou Couve-Nova ou Couve-Nova, etc., não funcionaria.
Para ver o aspeto da planta nas fases de crescimento e maturação, em vez de ter de esperar, pode usar uma "batota" para avançar rapidamente!
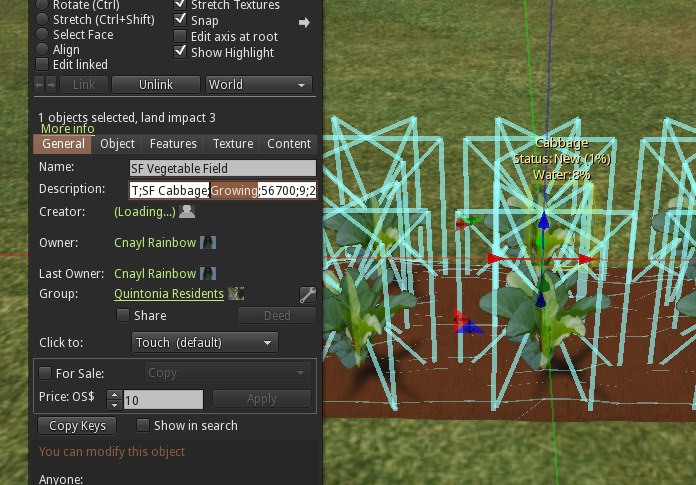
Edita o campo e na descrição deves ver que diz algo como
T;SF Cabbage;New;56700;9;2;Cabbage;-1987831;0;en-GB
Tudo o que tens de fazer é mudar a palavra New para Growing e depois reiniciar os scripts e a planta passará para a fase de crescimento após um ou dois segundos.
Repete o procedimento anterior, mas desta vez muda Growing para Ripe e, quando reiniciares os scripts, a planta passará para a fase de maturação.
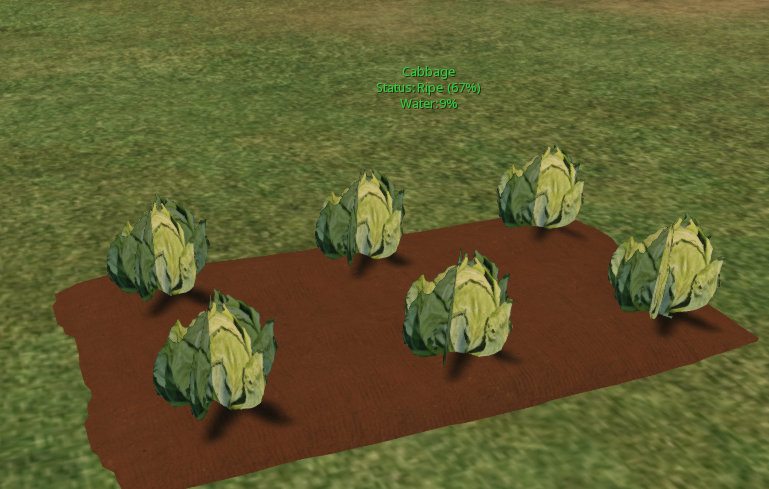
Por fim, podes clicar em colher para verificar se a tua nova colheita foi rezada corretamente e o campo volta a estar vazio.

Este trabalho de Buzzy Cnayl está licenciado sob umaLicença Creative Commons Atribuição-NãoComercial-CompartilhaIgual 4.0 Internacional.
Baseado num trabalho emhttps://satyrfarm.github.io/
- Detalhes
- Read Time: 1 min
13.6 Plants, Trees & Fields - Prim based
Comming soon...